

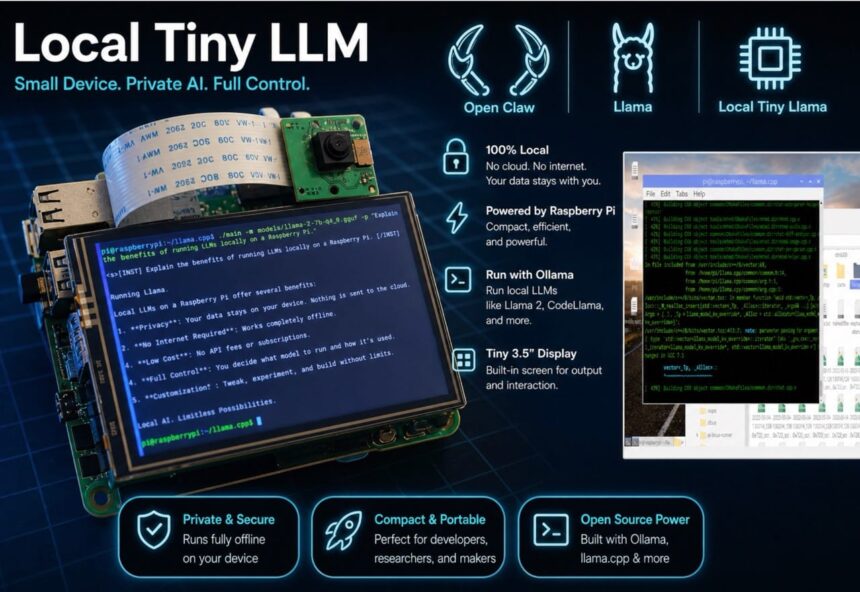
In this guide, you’ll learn how to build your own local AI system using lightweight LLMs, AI agents, and affordable hardware like a Raspberry Pi. No API costs. No cloud dependency. Total control.
AI Agents and AI LLM models are two of the most powerful and useful innovations in artificial intelligence. However, most modern AI LLMs rely on cloud-based services that require API keys for operation. These APIs often come with usage costs and raise privacy concerns.
When we use cloud AI, our questions, chat history, and personal data are sent to external servers, where there’s always a risk of data storage, analysis, or sharing with third parties. This makes many users uncomfortable, especially when working on sensitive or personal projects.

So, is there a way to use AI for free, without API costs, and with complete privacy? The answer is yes—by running AI LLMs locally on our own machines. In a local setup, the AI model runs entirely on the device, eliminating the need for an internet connection and ensuring that all data remains within the system.
However, the main challenge is that large AI models require high processing power, large memory, and significant storage, which can be difficult to achieve on small devices. To overcome this, we can use smaller, optimized, and quantized LLMs that are designed for specific tasks. Instead of running one large model, we use multiple tiny models, each specialized for a particular function.

For instance, TinyLlama can be used for basic chatbot functionality, Microsoft Phi-3 Mini is great for general AI tasks, Qwen models provide strong reasoning and coding capabilities, DeepSeek 1.5B is useful for lightweight reasoning, and Gemma 2B is optimized for efficient edge deployment.
These models require less memory and processing power, making them suitable for running on local devices. By combining these local LLMs with AI agents, we can build a powerful and flexible system. AI agents act as controllers that decide which model to use for a specific task. For instance, one agent can handle chatting, another can handle coding, and another can manage reasoning or automation.
In your project, the Pico Claw or Open Claw AI agent can serve as the primary controller, connecting to locally installed LLMs through tools like Ollama or llama.cpp. This enables dynamic switching between models based on the task, creating a multi-agent AI system that is both efficient and scalable.
For hardware, here we can run on devices like the Raspberry Pi 4 or Raspberry Pi 5, which function as local servers. Although these devices have limited processing power, they are capable of effectively running small LLMs. For enhanced performance, more powerful edge devices like the NVIDIA Jetson Nano or NVIDIA Jetson Orin Nano can be utilized, providing GPU acceleration and faster AI processing.
Bill of Material
Here in design, it’s better to use the more powerful SBCs like Nvidia Jetson and Orion to run more complex LLM models locally. However, here on my design, I’m using the RPI, which is sufficient for running most of the tiny versions of LLMs like TinyLama, DeepSeek R1, etc.
| ID | Component | Specification | Quantity |
| 1 | Raspberry Pi 4 / 5 | 4 GB Ram 32 Min Storage | 1 |
| 2 | RPi Cooling Fan Module | 5V Aluminium Heatsink with active cooling fan | 1 |
| 4 | AC to DC Power Adapter | 5v 2A | 1 |
| 5 | 5V 2000Mah LiPo Battery Mini Power Bank | 3.3v 2000Mah Rechargeable LiPo / Li-ion Battery | 1 |
| 6 | SSD Storage | 250 GB or 120 GB SSD | 1 |
| 7 | Raspberry Pi Touch Display | Raspberry Pi Touch Display Hat | 1 |
Designing Local LLM device
To design a device that can run lightweight LLMs locally, we need a single-board computer (SBC) like a Raspberry Pi or Jetson. Here, I have chosen the Raspberry Pi 4 with 4GB RAM. It is affordable, power-efficient, and capable of running small AI models.
For running LLMs locally, we will use the Raspberry Pi as our main system. The first important step is installing a 64-bit Linux OS, because 32-bit systems are not supported for most LLM frameworks and cannot run these models properly. So make sure you install Raspberry Pi OS (64-bit).
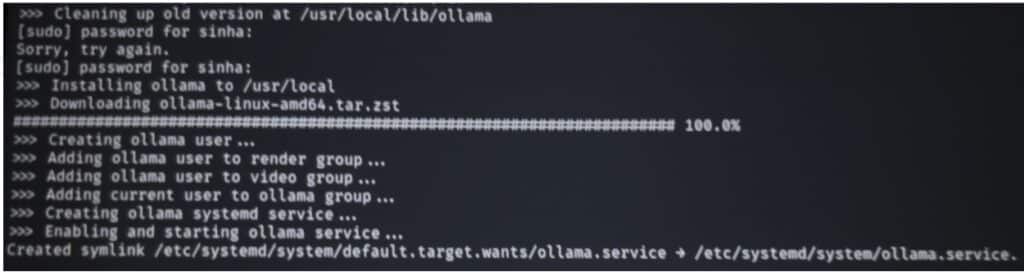
Once the OS is installed, we are ready to download and run LLMs. But before that, we need a tool to manage and run these models easily. For this, we use Ollama. It helps us download, manage, and run different local LLMs with simple commands. It also supports both local and some online models. To install the ollama, open the terminal and then run the command and verify the installation by running the next command
curl -fsSL https://ollama.com/install.sh | sh
ollama –version
Preparing Local LLMs
Next, after Ollama is installed, we can download and install local LLM models. One of the advantages of using Ollama is that you can install multiple LLMs and switch between them based on your needs. For example, you can use one model for coding, another for chatting, and another for reasoning tasks. This makes your system more efficient because each model is optimized for a specific type of work.
Below is a list of a few LLM models that you can run in raspberry pi locally, based on a specific task and command to run them:
| Model Name | Size | Use Case | Ollama Command |
| TinyLlama | ~1.1B | Basic chatbot | ollama run tinyllama |
| Phi-3 Mini | ~3.8B | Reasoning, tasks | ollama run phi3 |
| Gemma 2B | ~2B | General AI tasks | ollama run gemma:2b |
| Qwen 2 (1.8B) | ~1.8B | Coding + reasoning | ollama run qwen:1.8b |
| DeepSeek 1.5B | ~1.5B | Lightweight reasoning | ollama run deepseek |
| StableLM 1.6B | ~1.6B | Fast responses | ollama run stablelm2 |
To install any LLM, use the command:
ollama pull
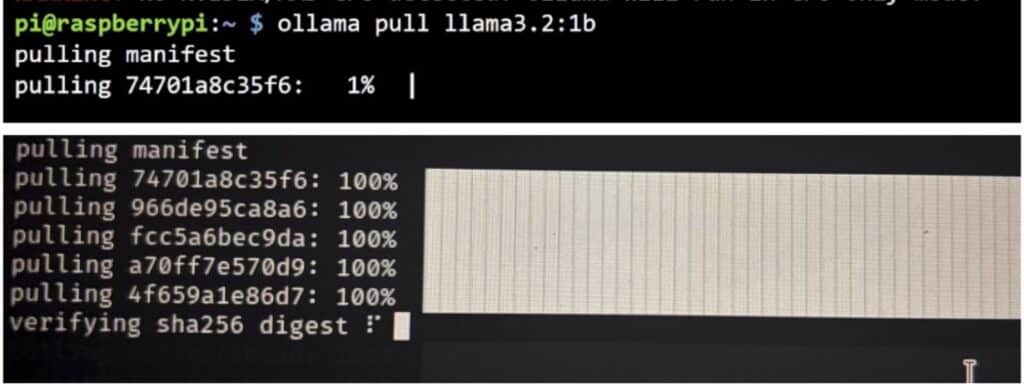
For example, to install a lightweight chat model:
ollama pull llama3.2:1b
Similarly, you can install other models by replacing the model name in the command:
ollama pull tinyllama
ollama pull phi3
ollama pull gemma:2b
ollama pull qwen:1.8b
ollama pull deepseek
Once the models are downloaded, you can run them anytime using:
ollama run
ollama run tinyllama
If you want to see all the models installed on your system, run:
ollama list
This will display the complete list of all locally installed LLMs on your Raspberry Pi.
Now you can run the LLMs and ask your task to do or a question.
Connection
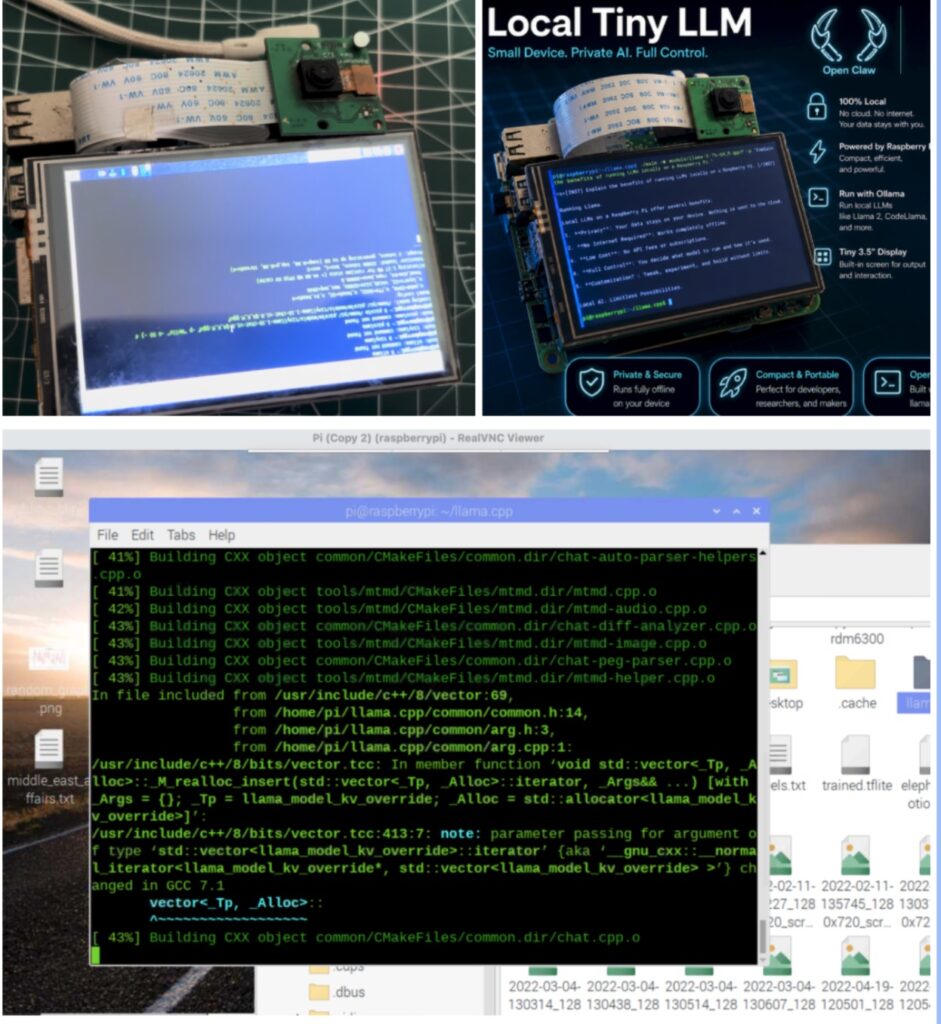
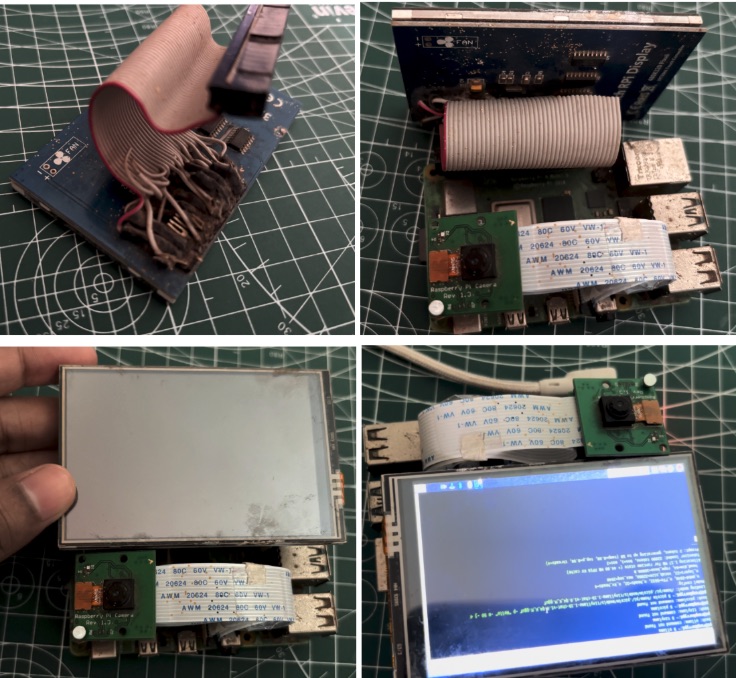
Now that the installation is complete, our device is ready. Next, we need to add the camera, display, and USB battery power supply to the Raspberry Pi to make a complete portable local LLM machine.
Connect the display to the Raspberry Pi 4 as shown in the figure below. Then insert the camera module into the camera (CSI) port on the Raspberry Pi, ensuring the ribbon cable is properly aligned and securely connected. Finally, connect a USB battery power supply to the USB port to power the device, making it fully portable and independent of a fixed power source (Refer to Fig 5 for connection)
Running LLM Locally on Raspberry Pi
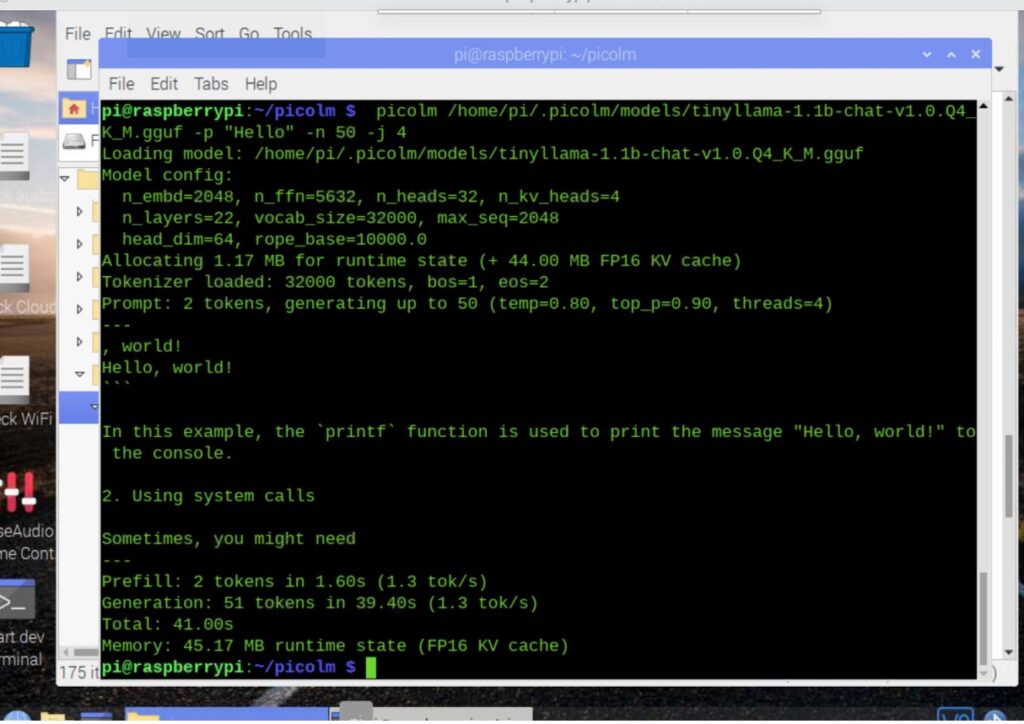
Now, your device is ready to use. Run the command “ollama run model name” and ask it any task or question; it will give you the same output as CHAT GPT, Deepseek, or similar AI LLM platforms.

Related Raspberry Pi AI projects: